Lekker: Traditional Tiramisu

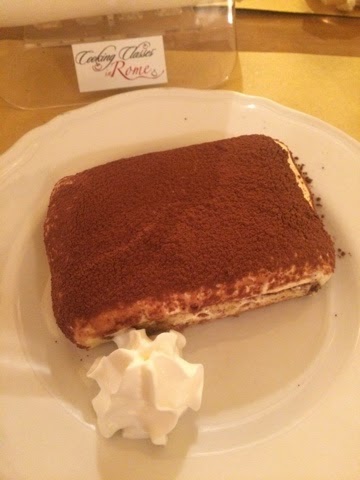
I can't imagine a better way to cap off this series of Italian recipes than with my favourite dessert of all time: the Italian classic tiramisu.

Back home in Florida, Publix Supermarkets (the holy grail of all supermarkets) makes the best tiramisu that requires all of my willpower to avoid. I've never attempted to make it myself, but Chef Andrea made it look so easy I have no doubt this will become a regular fixture on my dessert menu.

I was surprised to find no alcohol or liqueur in the preparation, but Chef Andrea proclaimed that any Italian bakery worth its sugar makes their tiramisu from scratch every day--alcohol is a preservative and is only used in sub-par cakes.

So, here we go!

Traditional Tiramisu
serves 6-8 people depending on how many sweettooths you have

What You Need
4 eggs
4 T confectioner's sugar
Pinch of fine salt
250 grams marscapone cheese (most supermarkets now carry this sweet, mild imported Italian cheese; it's the same stuff that goes into cheesecake)
Ladyfinger cookies (You can usually find these tucked away on a top or bottom shelf of the cookie aisle, since I've never met anyone who actually eats these just as-is.)
~2 cups espresso coffee (or just really really strongly brewed coffee)
Cocoa powder and/or grated or shaved chocolate to decorate the top

What You Do
1. To make the cream mixture, separate the egg yolks and the whites into two large bowls. Beat only the whites with 2 tablespoons of the confectioner's sugar and a small pinch of salt until they form stiff peaks.

2. In the second bowl, beat the egg yolks with the other 2 tablespoons of confectioner's sugar until the mixture is very thick and light in colour. Then use a rubber spatula to stir in the marscapone cheese until smooth and well incorporated.

3. Combine the egg yolk cream into the egg whites, folding gently with the spatula from the bottom to the top until well incorporated.

3. To assemble the tiramisu, dip half of the ladyfingers one at a time into the coffee mixture and line them along the bottom of a rectangular or square flat serving dish. (You may want to practice making them fit beforehand so you have an idea of how it'll work.) Spoon half of the cream mixture over them, and then repeat with a second layer of ladyfingers and the second half of the cream mixture.

4. Cover the top of the whole thing with sifted cocoa powder and/or finely grated or shaved chocolate to decorate the top. Chill in the fridge for at least 2 hours before serving. This dish can be made the day before and left in the fridge overnight, but in that case wait until just before serving to add the cocoa powder and shaved chocolate.

Posted on May 15, 2015 .

Lekker: Rosemary Roasted Potatoes (Patate al Forno)

Ha-roo! At the request of my ever-encouraging Bonus Dad, Harry Brindley, (whose brilliantly helpful blog slappHappe you should take a peek at) today's recipe is the Rosemary Roasted Potatoes I bragged about recently.

I discovered these in my cooking class here in Rome a few weeks ago, and they're bar-none the best roasted potatoes I've ever had. I know--how good can (pretty) plain roasted potatoes get, right? NO SIR. These babies, if done right, will knock your socks off and I can't wait to make them again. Give 'em a whirl, and let me know what you think.

This is the best picture I can offer you--with a table full of hungry college students, you don't really have time to be a food photo expert. But trust me, they're good, and the recipe for the meatballs are coming next too!

Rosemary Roasted Potatoes (Patate al Forno)
serves 4

What You Need
6 medium yellow potatoes (not Russet, just a basic yellow thin-skinned potato)
2 cloves garlic, roughly smashed (leave a thin layer of the skin ON!)
2 stalks fresh rosemary
4 T extra virgin olive oil
salt, to taste

What You Do
1. Preheat your oven to 350 degrees F. Peel and slice the potatoes into slim wedges, and put them in a bowl of water until you're ready to use them.

2. Ready to go? Remove the potatoes and dry them off a bit with paper towels. Run your hand down the rosemary stalk in the opposite direction that the leaves tilt in order to strip the leaves off. In a large bowl, toss the potato wedges with the olive oil, garlic cloves, rosemary leaves, and a light sprinkling of salt. 

3. Arrange the dressed potato wedges on a nonstick tray, making sure that they DO NOT OVERLAP. This is critical to ensuring you get some good crispy bits. Roast at 350 for about 45 minutes or until they are crispy, browned in spots and fork tender. This may take a little more or a little less depending on the size of the potatoes; keep an eye on them.

4. Remove from the oven and let cool for 2-3 minutes. This will make them easier to unstick from the tray. then, just serve! Nom nom nom.

Posted on May 1, 2015 .

Lekker: Meatballs in White Wine Sauce (Polpette della Nonna)

Okidoke, here we go again! Continuing on with my series of classic Italian recipes adopted from my cooking classes with Chef Andrea and re-written here with permission, today I have some delicious Meatballs in White Wine Sauce to offer you.

We served these with yummy Rosemary Roasted Potatoes, but I can imagine they would be equally delicious over some egg noodles. I typically only do Swedish meatballs with lingonberry jam and the whole shebang, but this is a fabulous more traditional option. I love that Chef Andrea writes his recipes in the same casual, intuitive way that I usually do--a glass of this, a random nebulous amount of "loaf"--though I know it can be frustrating for the perfectionists among us. Just have a glass or three of the Chardonnay that the recipe calls for, and suddenly it'll matter a whole lot less, I promise.

Buon appetito! 

I assure you, this is the only (and therefore by default, the best) photo I could grab of the dish before it was devoured by hungry culinary students.

Meatballs in White Wine Sauce (Polpette della Nonna)
serves 4

What You Need
1 pound ground meat (the ideal mixture is 70% beef and 30% unseasoned pork sausage, squeezed from their casings, or just plain ground pork if you can't find unseasoned sausages)
1 egg
1 cup grated Parmesan or Pecorino Romano cheese
1/3 cup grated Fontina or Edam cheese
1/2 loaf leftover or day-old bread such as baguette or ciabatta, torn into small pieces and soaked in milk (no crust, use only the soft part of the bread)
1 T salt
pepper
1/2 cup fine dry unseasoned breadcrumbs (the kind you get in a can, not the larger grain panko)

For the sauce:
5 T extra virgin olive oil
1 clove garlic, lightly smashed, skin on (You can rub it gently to remove the majority of the coarser outside skin, but yes, we're leaving the skin on for this part. Roll with it.)
1 glass dry white wine, preferably Chardonnay
Fresh herbs of your choice, roughly chopped (sage, rosemary, marjoram, thyme, etc...whatever blend you like)

What You Do
1. In a large bowl, use your hands to mix together the ground meat, grated cheeses, egg, milk-soaked bread, and salt and pepper. This is your chance to show off your He-Man strength! Mix it powerfully (excellent forearm workout) until it's completely smooth and all the ingredients are blended to uniformity. Set aside for about half an hour to let it rest.

2. Shape the meat mixture into meatballs, making sure to roll them firmly in your hands until they are compact balls slightly smaller than a golf ball with no cracks, gaps, or lines. Roll them in the breadcrumbs just until they're lightly coated.

3. In the meantime, in a large shallow frying pan over low heat, heat the olive oil and cook the garlic until it starts to become golden. Raise the heat to medium-high and begin adding the meatballs. Make sure not to crowd the pan too much, else they'll steam instead of brown. Fry until they're nicely browned outside but still a bit undercooked on the inside. If you have to work in batches it's okay, just add all the meatballs back into the pan before you proceed to the next step.

4. Now add the wine (whatever you haven't drank, natch) and fresh herbs and cook, covered, for 10-15 minutes until the majority of the wine has evaporated. During this time the meatballs will cook all the way through, but make sure to turn them once or twice (or just shake the pan violently, like I do, because I'm lazy) so they get nicely coated with the sauce. Season with salt and pepper and serve hot.

Posted on April 16, 2015 .

Lekker: Tomato Basil Mussels

Interrupting my series of traditional Roman recipes from my cooking class with Chef Andrea, I'm here to bring you one of my all-time favourite recipes--the sexy, tasty, PERFECT Italian inspired date night meal: Tomato Basil Mussels.

I first discovered these when I was in Italy last summer in a small town called Ospedaletti on the northern coast. I'd never had mussels before, but when my uncle ordered a pot I couldn't resist trying one. (Try everything twice, right?)

They're his favourite food, and he always cites a sweet story to go along with them: many years ago, he and his wife took a trip to visit my parents at their home in South Africa where they went to the beach to pick mussels straight from the shore. They cooked them right then and there on the beach in a pot of boiling seawater, accompanied only by a bottle of white South African wine that had been shoved into the wet sand to keep cold.

The mussels my uncle ordered on *this* particular salty beach night were still simple and delicious, but a little more dressed up with tomatoes and basil and a few other things I sussed out after being a complete weirdo in the middle of the restaurant, spreading the sauce out on a plate to closer examine the contents, sniffing it, tasting it, and generally making a strange sight of myself. NO SHAME IN MY TOMATO BASIL GAME THOUGH, because as soon as I got home to the States I got to work trying to replicate it and I think I've got it pretty down pat. *brushes shoulders off*

This weekend my main study abroad boo Gracia and I were able to snag our dorm kitchen for a two-hour block and got a chance to cook up these beauties. We'd spied them at the fish counter many times before, and at only 3 Euro per kilo (that's about an obscene $2 a pound, and my father nearly wept when I told him) it would have been foolish to resist.

Gracia is the closest I come to having a date over here but I do recommend this as an actual date meal, something to cook together. It's perfectly achievable by yourself, of course, but even more fun to do with someone else--and in my opinion, eating them is just plain sexy too: using your hands to eat, joining each other in giggles over struggling with the shells, juice dripping down...places...

Ahem.

Here we go!

LOOK AT THAT BEAUTY! I like to eat my mussels solely with a hunk of French bread to soak up the delicious broth, but Gracia (and many others I know) likes to serve mussels on top of a pile of spaghetti with the broth acting as a sauce.

That was a fake out, sorry. BEFORE we begin, a few things to know about mussels if you've never made them:

  • They're pretty cheap, as far as seafood is concerned--you can usually find them for about $5-$6 a pound in the States. When you're buying them at the fish counter inspect them closely for any broken shells or ones that are open. IF THEY ARE OPEN THEY ARE DEAD! Mussels should have dark glossy shells and be tightly closed, and they should not be stored on ice.
     
  • Mussels are alive before you cook them, so as soon as you get them home unwrap them and store them in the fridge in a bowl with some damp paper towels wrapped around them. Only buy mussels the day you plan to cook them.
     
  • About 20-30 minutes before you're ready for them to go into the pot, fill two large bowls with cold water and salt one a little bit. Dump the mussels into the bowl with the salted water (here they can "breathe" and expel any grit or sand they're holding on to) and go through them, tossing any that are broken or otherwise open.
     
  • Under cold running water, one at a time, use a small brush or pad to thoroughly scrub the outside of the shell to remove any barnacles and sea dirt. You'll also have to remove the "beard", which are fibers that protrude from the shell. It's gross and looks like something you'd find wrapped around your vacuum cleaner brush, but it's easy to get rid of--just hold the mussel in one hand, and with the other grasp the beard and pull down and out towards the hinge. The mussel will give it up. Toss the mussel (gently) into the second bowl of unsalted water and keep them there until you're ready to steam.

Tomato Basil Mussels
serves 2

What You Need
1 pound of mussels per person, approximately
2 T olive oil
1 smallish white or yellow onion, finely diced
2 cloves garlic, minced
1/2 cup dry white wine
1 28-ounce can whole peeled tomatoes in their juice, crushed roughly with your hands (so fun!)
1 large handful fresh basil leaves, roughly chopped
~1 cup low sodium vegetable broth (you might need a little more depending on how "brothy" you want the sauce to be)
1 lemon, scrubbed clean and sliced into rounds
To serve: a hunk of crusty bread, or cooked spaghetti. Or nothing at all, like the animal you are.

What You Do
1. Prep the mussels as described above. (This is where having two people comes in handy, because one of you can be doing mussel prep while the other does broth prep.)

2. Meanwhile in a large pot over medium heat, saute your onions and garlic together in the olive oil for about 4 minutes or until beginning to turn golden brown. Add the wine and cook for about 2 minutes more. Add the tomatoes, half of the basil, and the vegetable broth and turn heat to low to simmer for about 10 minutes or so just to let the flavours meld. 

3. Time to add your mussels! Drain them from their water bath and add them to the pot along with the other half of the basil and about half of the lemon rounds. Cover the pot with a lid and let those babies steam away for 5-10 minutes until they're all opened, stirring once in between to make sure that delicious broth gets all up into those nooks and crannies.

4. Garnish with a lemon slice and any basil you have left over, and serve! Discard any mussels that didn't open (they're probably dead) and have at it. You can use a fork to pry them out of their shells and into your waiting maw, or you can be uber sophisticated and use one of the shells to scoop it out. Enjoy!

Some advice: you might want to fish out the lemon slices from the pot before you serve. Depending on what kind of lemons you get, their skins might exude a little TOO much lemon flavour if they sit in the broth too long, making the whole thing decidedly bitter.

There is no love like that betwixt a woman and her mussels.

Ciao!

Posted on March 29, 2015 .

Lekker: Arugula & Goat Cheese Bruschetta

So, one kind of bruschetta isn't enough for you? My excellent Tomato Basil Bruschetta alone just isn't good enough for you?

Fear not, friends. I'm back today with a second variety of bruschetta you can add to your serving tray, one that was teased in the photo posted in the previous entry.

 See?

So! The second variety is actually called Rocket & Stracchino Bruschetta, with "rocket" being the word for arugula throughout Europe and "stracchino" being the type of Italian cheese we used.

Stracchino, as explained in my blog entry on my separate study abroad blog about the cooking class where this recipe comes from, is a mild white creamy cheese similar to cream cheese. Head Chef Andrea of Cooking Classes in Rome, however, recommends that if you can't find stracchino (which I find highly unlikely to be available in the States) you use goat cheese.

THEREBY...

Arugula & Goat Cheese Bruschetta
serves 4

What You Need
8 slices thick white Italian bread, or anything that can support the weight of being bruschetta
2 large cloves garlic, peeled and sliced in half lengthways
~3-4 T good quality cold pressed extra virgin olive oil
1 bunch fresh arugula (I think you can probably get away with one of the pre-washed bags from the supermarket--you just need enough to do a small heaping on each toast)
a few drops of lemon juice, to taste
salt & pepper
Small log of plain goat cheese, enough to get 8 small rounds out of it, one for each toast

What You Do
1. Grill the slices of bread on your stovetop (or in your oven, or in your toaster) until lightly golden brown and possibly charred in a few spots. You want it to get nice and crispy and dry.

2. Rub one side of each slice of bread with half a clove of raw garlic, just lightly. Then drizzle each slice of bread with a tiny bit of olive oil. Discard the garlic.

3. Finely chop the arugula leaves and dress them lightly with olive oil, a few drops of lemon juice, and salt and pepper to taste.

4. When you're ready to serve, simply pile a bit of the arugula salad on each toast and top with a round of goat cheese (or dollop of stracchino if you were so lucky to get it.) Done!

Lekker: Tomato Basil Bruschetta

Ciao tutti!

Long time, no chat! It's been a busy two months since I last posted, because of Christmas, New year's, and then--moving to Rome, Italy, for five months as part of a study abroad program at my university.

RIGHT????

I started a separate blog to detail these study-abroad adventures called A Broad Travelling, so feel free to go check that out to see what I've been up to. Given that I'm in arguably the world's most amazing country for food, suffice to say I've been eating my equivalent body weight in pasta, pizza, Nutella, gelato, and wine.

Cooking, however, has been a MONUMENTAL challenge. I'm living on campus in a dorm, with no cafeteria and only two regular-sized kitchens (one standard fridge, one small oven, and three oven burners per kitchen) intended to serve the cooking needs of over 140 students. It's frustrating and I miss cooking terribly, but we're doing our best to make it work.

Last week, blessedly, I had the chance to take an actual cooking class here in Rome at the elbow of a true Italian chef, focused on locally sourced and seasonal, sustainable food. (I blathered about it here, with tons more photos.)  I KNOW, THIS IS MY LIFE NOW GUYS. Fortunately for YOU, I have permission to share all those delicious recipes with you here! Thanks, Chef Andrea!

First up is my recipe for some simple, delicious Tomato Basil Bruschetta that I dreamed up years ago--and was thrilled to find out is also Chef Andrea's recipe. It's super simple and can be done largely in advance so you really have no excuse. Buon appetito!

Here, pictured next to a second kind of bruschetta that will also be coming up on the blog in the next few days!

Tomato Basil Bruschetta (a/k/a Bruschetta al Pomodoro e Basilico)
serves 4

What You Need
8 slices think white Italian bread, or any other kind that can answer the call to be bruschetta
4 large Roma tomatoes (though we used round tomatoes on the vine, here called 'Pomodori Colonna')
10-12 leaves fresh basil, roughly torn
1 clove garlic, peeled and crushed into a few big rough pieces
2 additional large cloves garlic, sliced in half lengthways
4 T cold pressed extra virgin olive oil, plus extra for drizzling (since this is a raw dish that involves marinating, it's REALLY important to use a high quality olive oil)
salt and pepper, to taste

What You Do
1. Roughly chop the tomatoes into a small dice (don't worry about removing skin or seeds) and combine in a small bowl with the torn basil leaves, crushed garlic, olive oil, salt and pepper. Toss to combine and leave to marinate out on the counter for at least 30 minutes and up to several hours.

2. Grill the slices of bread on your stovetop (or in your oven, or in your toaster) until lightly golden brown and possibly charred in a few spots. You want it to get nice and crispy and dry.

3. Rub one side of each slice of bread with half a clove of raw garlic, just lightly. Then drizzle each slice of bread with a tiny bit of olive oil.

4. When you're ready to serve, simply compile your tomato-basil topping on top of each slice of toast, and serve. You can fish out the chunks of garlic if you have extra-sensitive guests, but I personally LOVE the spicy kick of garlic so I leave it in. I don't care to kiss anyone that can't get down with garlic, anyway.

Lekker: Inverness Risotto

I wrote this post instead of doing homework. College is going great, thank you for asking.

Today's post is about one of my favourite dishes that I was introduced to by my old roommate, TB. (Remember him?) This is his classic, so I've named it after the street we used to live on: Inverness Risotto.

Risotto is awesome. I rarely get to eat it because it's basically just carby indulgence, but it's SO GOOD and there are so many ways to change it up. This recipe is my favorite and the way I remember TB making it most often: just mushrooms, peas, and onions. It's a classic flavour combination and I'm sure you'll love it. If you don't...well, sucks to be you I guess.

Hungry yet?

Risotto is awesome, but it's also time consuming. It needs constant attention, much like a baby or a needy girlfriend, but you can't eat a baby.

You've probably heard before that if you want nice fluffy rice with properly separated grains, you never stir or otherwise disturb the rice when cooking. The exact opposite is true of risotto. That's because stirring rice during cooking releases the starch in the grains, and starch is a thickener--a necessary component for risotto but one that results in goopy rice for other dishes.

The point is, don't assume you can multitask very well whilst making this dish. Fortunately the end result is totally worth it, and to me the constant stirring and monitoring is oddly soothing.

Stretching the definition of science here, but that's as science-y as I feel like getting. 

Don't trouble yourselves about the shrimp-looking things in there. That's langosteen, and it's like the middle child between shrimp and lobster (aka it's amazeballs) but it's completely wasted hidden in here. #imessedup

Inverness Risotto
serves 4

What You Need
3 T unsalted butter
1 T olive oil
1 cup Arborio rice
1 cup dry white wine (You know me, it's always Sauvingnon Blanc over here.)
3 cups chicken or vegetable broth
~6 oz baby bella mushrooms, finely diced (I know, that's a dumb measurement and I'm sorry; basically it wound up being 6 mushrooms but it really depends what size they are. Just use your judgement and remember that mushrooms shrink considerably when cooked; risotto is all about proportion between rice and other ingredients.)
1 cup peas, fresh or frozen & thawed
1/2 a yellow onion, finely diced (You could use a shallot instead if you want.)
1/4 cup shredded Parmesan cheese
Zest of 1/2 a lemon
Salt & freshly ground pepper, to taste (Though you probably won't need any salt since most broth is salty enough.)

What You Do
1. So you've lovingly diced up your onion and mushrooms so that they're approximately the size of a pea, yes? (Well, the mushrooms can be slightly bigger since they'll shrink down during cooking, but you get it. You're smart. You also look extra fabulous today, if I may say so. Those pants make your butt look great!) My point is that you want consistency in size for a risotto.

Shit. Where was I.

Okay so in a medium sized deep saucepan or wok (anything you'd do a stir fry in really) over medium heat, melt one tablespoon of the butter. Add the diced onions and cook them until they're soft and translucent and all kinds of golden-brown delicious. Remove them into a bowl and cover to keep warm.

2. Add the second tablespoon of butter, melt, and add the mushrooms, cooking THOSE until they're also kinds of soft and golden-brown delicious. Nom nom nom. Dump those in the same bowl with the onions.

3. Now the fun starts! If you have laundry that needs to go into the dryer or a wine glass that needs to be topped off, now's the time to do that because you're about to set up shop at the stove for about 30 minutes.

The mushrooms will have soaked up the majority of that butter, so go ahead and toss in that final tablespoon of butter along with the tablespoon of olive oil. Once the butter is melted, toss in your dry rice. This is a process called "toasting" and quite frankly it adds such a delicious deep, nutty flavour to rice that I think it should be done before cooking ANY rice dish. But anyway. Stir the rice very often so it doesn't get burned, and after about 3-4 minutes you should be able to smell that lovely nuttiness and see the grains beginning to turn translucent at the very edges.

4. Slowly stir in the wine and turn the heat down to a simmer. Keep stirring. Stir again. Park your ass at that stove and don't expect to go anywhere for the next 20 minutes, because that's what you do with risotto. You stir it and baby it and gently coax all that delicious starch out of those grains and TRUST ME, it is worth it.

5. Wine's all gone? (I mean the wine in the pan, not the one in your hand. I am *sure* that's gone.) Excellent, now time for the chicken broth. Add 1 cup of warm chicken broth, stir, and cook until mostly gone. Repeat with the second cup.

6. When it comes time to add the third cup, toss in your onions, mushrooms, peas, lemon zest, and cheese at this point as well. Keep cooking and stirring (gently now) until about half of the liquid is absorbed (it should still be reasonably creamy), and voila. You have risotto!

Serve as a side dish, or just enjoy an indulgent bowl of carb wonder.

Posted on December 10, 2014 .